


%5B1%5D.jpg)


%5B1%5D.jpg)


 I have seen various tutorials for making a peg bag and I have looked at them and then made my own to fit the coat hanger that I had. So I used a wooden coat hanger that we have had for what seems like forever and cupcake tea towel that I bought from Matalan when I took part in the Cupcake swap last year.
I am going to fold the tea towel so that the cakes will still appear the right way up (hopefully!)
 I folded up the bottom of the tea towel until it was about 11 cm down from the top edge and then folded down the top to look at the proportions and size of the peg bag. You will need to play around with this as some tea towels can be different sizes too.

I then placed my wooden coat hanger on the top fold to check for size and position.

I then marked the top centre on the fold where the hanger hook will need to go through the fabric. Here I put a button hole to add strength to that area once the pegs were added.

I stitched the button hole before constructing the peg bag.

Using a water soluble pen I marked a curve to sew along to add shape for the coat hanger to sit in when in use. This should stop the bag from moving around and falling off the hanger.

I then flapped the top section down, the bottom section up then pinned all the way round, including along the marked line.
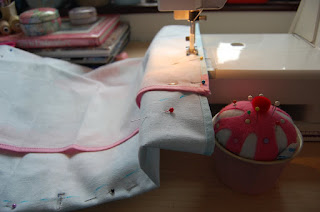
Then using straight stitch sew along the side seams and across the top being sure to follow the marked curve line.
 Front view: The top section should slightly overlap the bottom section. That is just my preference, it is up to you.

Back view: Lovely cupcakes.
Two days later!! I was able to use it for the first time....

The curve at the top worked well and I know just need to remember to bring the peg bag indoors if it rains!!
Let me know if you have another peg bag idea that I could try. I have another quilt block for you tomorrow.
xx


%5B1%5D.jpg)


.JPG)


8 comments:
That's a very cute peg bag.
and about the flower block I posted about - yes, it is applique.
Cute bag and great tutorial. Thanks.
I was just thinking the other day while putting the laundry out that I needed one of these! Now to tackle the sewing machine.
Lisa :)
Great tutorial!
Wonderful - it looks as though is may be an early project for me. I am not YET a sewer. With great tutorials like this I should be fine!
what a good idea, it looks great!
: )
I love this! What a cute idea!
love it!!! x
Post a Comment